How to Correctly Remove DocSpace in Windows 7/8/10?
Seeking solutions to remove DocSpace from your PC? Then browse this page, you will find useful information to read.

DocSpace can easily perform repetitive tasks, such as dragging and dropping files in its UI or quickly building your own unattended Robotic Process Automation tasks. It can run either an interactive desktop application for one-on-one needs or as an unattended Windows service to manage thousands of users. Files stored locally or in the cloud are processed in an environment that you can control instead of some server halfway around the world. To uninstall this program, refer to the following content.

How to Use Bloatware Uninstaller to Quickly Remove DocSpace?
Step 1. Download, install and launch Bloatware Uninstaller from your desktop.
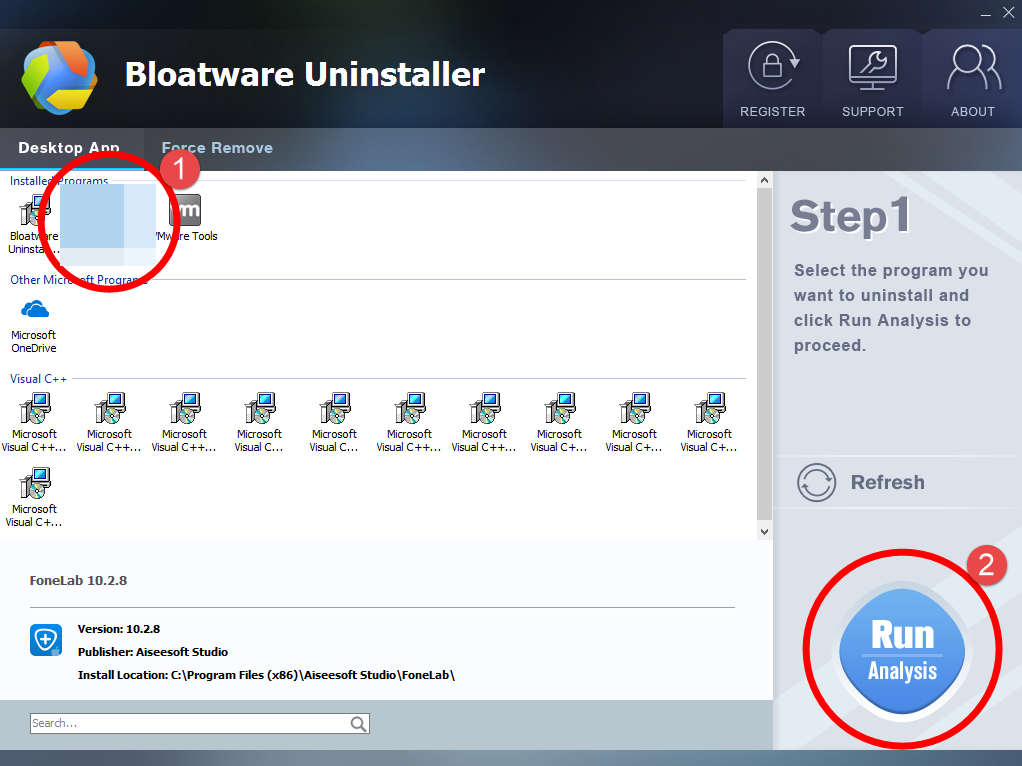
Step 2. Select DocSpace in the list, and click Run Analysis in the lower right corner. It will take just a few seconds.
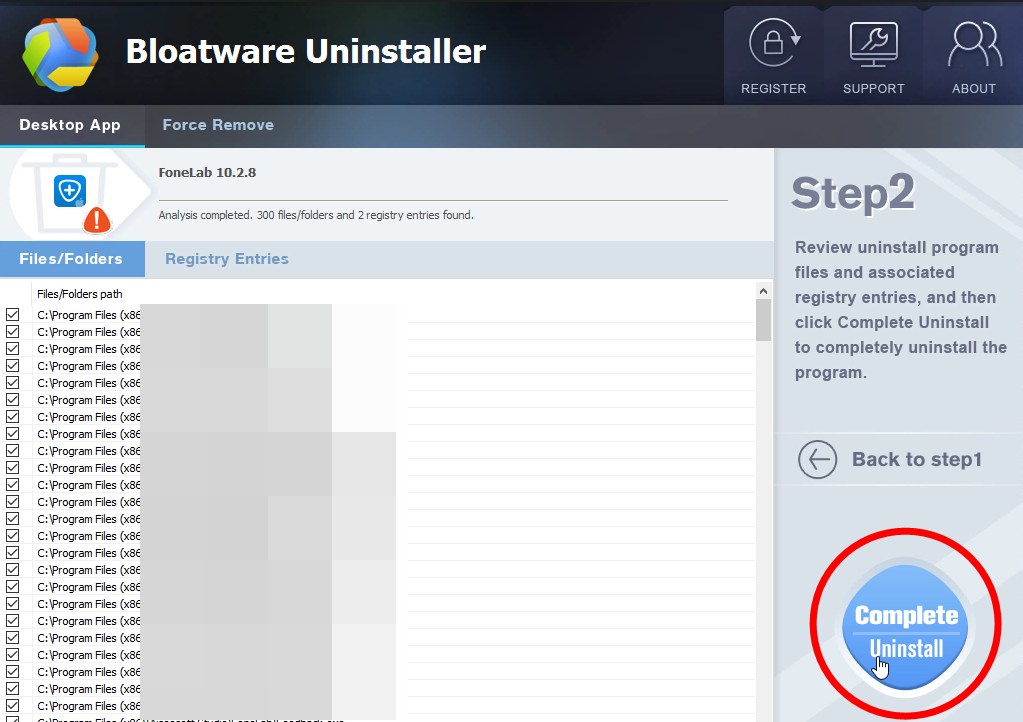
Step 3. Wait for it to finish scanning all the files, and click Complete Uninstall in the lower right corner to delete the files listed.
Step 4. Follow the prompts to move on, click Scan Leftovers, and click Delete Leftovers in the lower right corner to delete the leftovers listed.


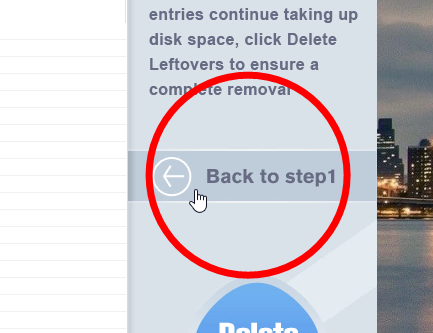
Step 5. Click Back to step1 to check the currently installed programs, see if DocSpace has been removed. For any question you don’t want to ask or problem you encounter, reach their customer service for immediate assistance.
Here is an example video:
Regular Steps to Remove DocSpace in Windows
1. Log in your system with an administrator account (in most of the case, the one you have been using), so that you will be able to go through all the steps, which are considered to be the actions of making changes in Windows. Otherwise you may need to provide the password when trying to remove DocSpace.
But if you are using the same account all the time, don’t bother to understand what I just said, and go to the next.
2. Quit DocSpace if it is running, and end all the related processes in the background via Task Manager.
Press and hold Ctrl + Alt + Del on your keyboard to open Task Manager > Make sure the program isn’t running by checking the Applications tab, then go to the Processes tab, and end the related ones. They probably have similar names.
3. Remove DocSpace through the Programs list.
Windows 7: Click on Start button in the bottom left corner (or simply hit the Windows key on your keyboard), move your mouse pointer to the Control Panel and then click on it. > Select Uninstall a program under the Programs section. (If you’re a user of Windows XP, click on Add or Remove Programs.)
Windows 8: Right-click on Start button in the lower-left corner, and click on Control Panel > Select Uninstall a program under the Programs section.
Windows 10: Open the Start menu > Click Settings > Click System on the Settings menu > Select Apps & features from the left pane, then a list of all installed apps appears in the right pane.
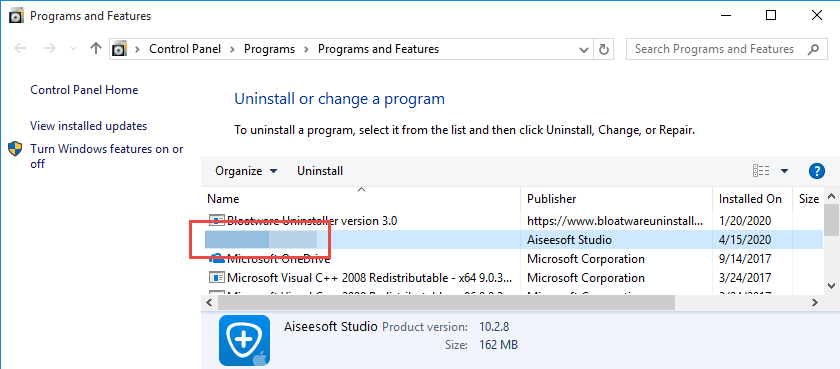
Follow the on-screen instructions to finish the process.
4. Delete the vestiges from Registry Editor to completely remove DocSpace.
If you’ve never done this before, not even for once, I suggest backing up your Registry before continuing. More troubles would be brought if anything is deleted by mistake. And it’s way too complicated to explain how to restore the data. So, just be careful.
To open the Registry Editor:
Windows 7: Click on Start button (or simply click the Windows key on your keyboard), type “regedit” in the box and press Enter key.
Windows 8: Just like how you opened Control Panel > Hover your mouse pointer to the bottom right corner until you see the charms bar pops up from the right side, type “regedit” in the search box, and hit the Enter key on your keyboard.
Windows 10: Executing “regedit” from any command-line area (just like how you do it on Windows 8).
Then the Registry Editor will be presented with a new window > On the navigator, click Edit, then Find… > Enter “DocSpace” to search its leftovers > Once found, right-click or tab-and-hold it and select Delete > You’ll be asked to confirm the key or value deletion request, tap or click Yes to completely remove DocSpace.
5. Restart your computer.
The kind of that benefits from a value or key removal is usually the kind of thing that requires a PC restart to take effect.
By now You have come a long way to remove DocSpace. Personally they are pretty much the same thing in different versions of Windows. So when I switch between them, I won’t be confused. Do you? Well, there is actually another way that applies to all the popular Windows operating systems. Find out the way under the next subtitle.
- Uncategorized
- 05 Jun 2020