How to Uninstall Adobe Acrobat Reader DC from PC?
“I need to uninstall Adobe Acrobat Reader DC and when I click on the uninstall button the icon comes up with “preparing to remove” but just stays there for up to 15 minutes and then goes off. What can I do to completely remove it? Thanksssss!”
Today our uninstall guides team write this post to help you uninstall Adobe Acrobat Reader DC on your own Windows computer. This troubleshooting guide should also work for other versions of Windows, such as 10, 8.1, 8, and 7. To do so, please read the very specific part of this how-to-guide to quickly get rid of Adobe Acrobat Reader DC.
Adobe has updated his free “Acrobat Reader” for viewing, printing and annotating PDF’s to “Adobe Reader DC“, where “DC” means “Document Cloud“. The Acrobat Reader DC gives you the ability to work with PDF documents in any desktop or mobile device if you’re connected to free Adobe Document Cloud services.
Take care when you have to remove Adobe Acrobat Reader DC from computer, and better follow the professional guidance step by step, in case of unnecessary troubles during the removal.
Now, you may proceed to the troubleshooting parts.
Part 1: Uninstall Adobe Acrobat Reader DC with Advanced remover
In this part, the bloatware uninstaller will uninstall Adobe Acrobat Reader DC in quite short time, and the best part is, it will delete the remaining files of the target app all together, so you won’t have to worry about the leftovers in using this tool.
1. To start, you save all of unsaved files, then exit the client
- Go to the toolbar and negative the Windows Task Manager (shortcuts Ctrl + Shift + ESC), and end the below “Adobe Acrobat Reader DC, Adobe Acrobat Update Service & Adobe RdrCEF” manually.
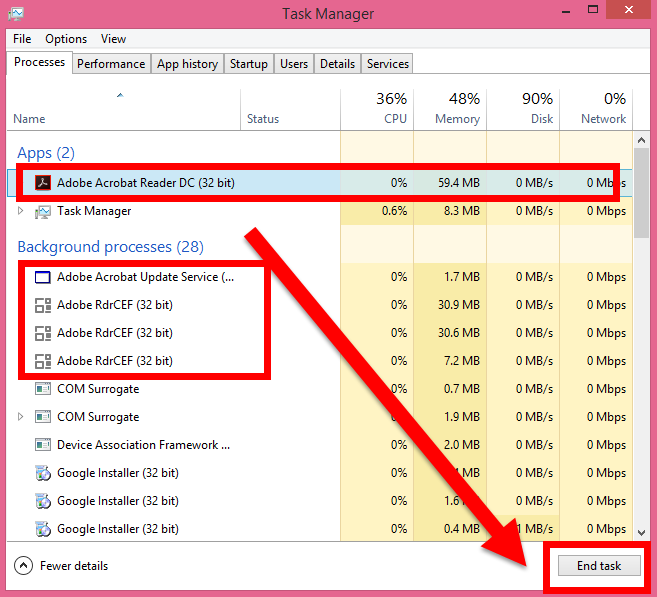
2. Launch bloatware uninstaller to run removal
Step 1. First select Adobe Acrobat Reader DC in the installed programs list, and then hit the green button of Run Analysis to begin removal;
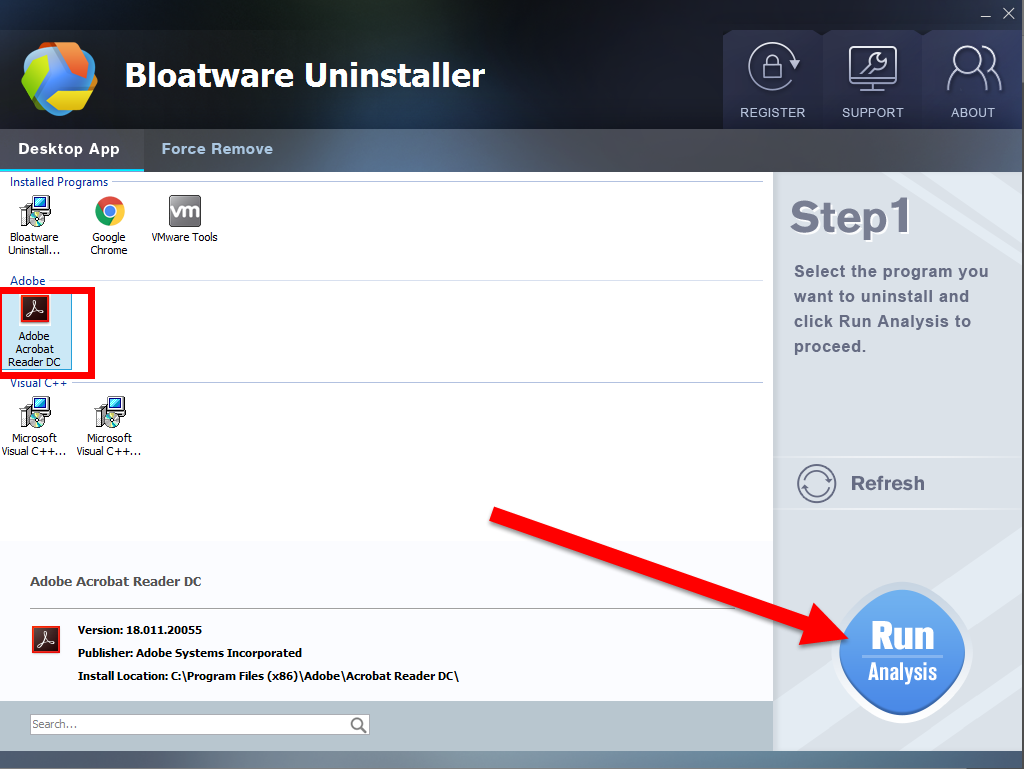
Step 2. Just wait for a second to let BU analysis Adobe Acrobat Reader DC, and then easily press Complete Uninstall button to continue;
Step 3. Wait for a while until the Scan Leftovers button lights up, then click on it. Then, click on “Delete Leftovers” button to completely uninstall Adobe Acrobat Reader DC.
Clearly, the leftovers which were the most concern issue that the users worry about have been completely removed in Step 3, so you don’t need to worry about the safety and clean this tool will do.
See more information in this video tutorial:
Part 2: Uninstall Adobe Acrobat Reader DC with Programs & Features
In this part, you might go through the Windows default feature—Programs & Features, to certainly uninstall Adobe Acrobat Reader DC from computer if it goes well. Now follow our guide to remove it:
1. To start, you save all of unsaved files, then exit the client
- Go to the toolbar and negative the Windows Task Manager (shortcuts Ctrl + Shift + ESC), and end the below “Adobe Acrobat Reader DC, Adobe Acrobat Update Service & Adobe RdrCEF” manually.
2. Open Control Panel, click on the link “Uninstall a program” and locate the target Adobe Acrobat Reader DC.
3. Launch the embedded Uninstall option, or press the Enter key on your keyboard, when you’re ready.
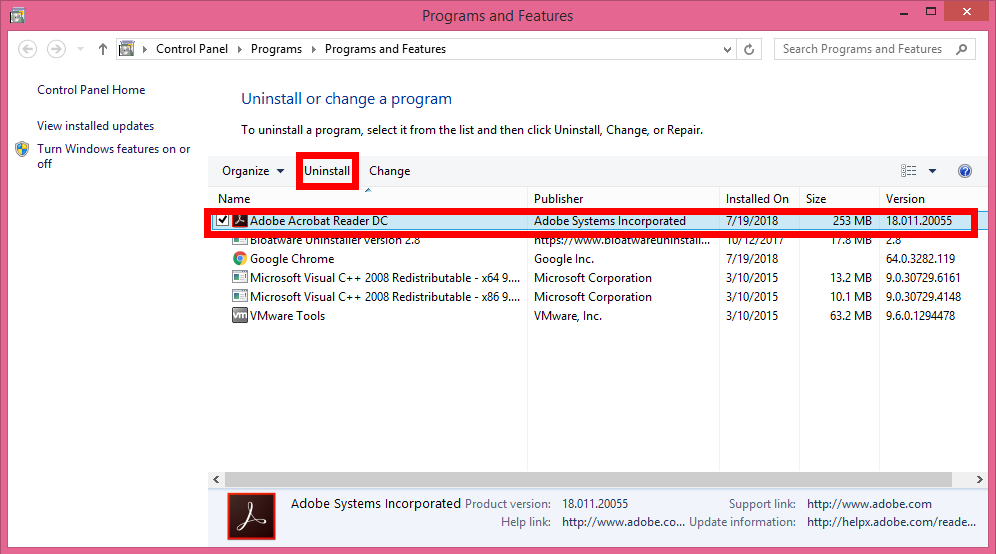
4. Press the Yes button on the below “Programs & Features” window.

5. Sit tight when your request is being processed.
6. To complete the uninstall process, you need to reboot your system manually (at a later date).
Unhide all hidden & protected files temporarily. Head to filesytem and/or Windows Registry and try cleaning up other leftovers that have “Adobe” as manufacturer.
7. In Windows, search for and open Run;
8. Type regedit in the box and hit OK;
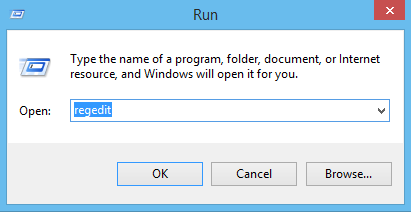
9. Then you will go to Registry Editor, delete the Registry keys related to Adobe Acrobat Reader DC;
10. Or press Ctrl + F to negative Search box and type the key words Adobe Acrobat Reader DC in the box;
11. Hit Find Next, delete the target item when it shows up.
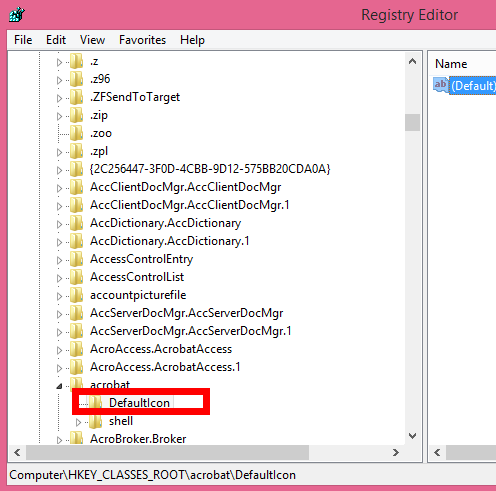
12. Restart the computer to complete the process.
Now it is barely finished uninstalling Adobe Acrobat Reader DC in manual process. Of course if you want the easy steps to do it, choose part I with bloatware remover.
More tips: How to disable user rights in adobe acrobat reader DC?
- File->Save as other->Reader extended PDf->Enable more tools (Include form fill in and ave->Save now
How to disable Adobe Acrobat Reader DC Automatic Updates
1. Simultaneously press Windows + R keys to open run command box.
2. In run command box, type: services.msc and press Enter.

3. Double click to open “Adobe Acrobat Update Service” properties (AdobeARMservice).
4. Set the Startup type to Disabled.

5. Click OK and restart your computer.
– After following the above steps, Adobe Reader DC will not download and install updates automatically.
– If you want to download and install new updates manually, then, from Adobe Reader’s DC menu, choose: Help > Check for Updates. *
* Note: If you want to also remove the Check for Updates option, from the Adobe Reader’s DC menu, then follow the steps mentioned at the end of this article.

- Adobe Software, PDF
- 25 Jul 2018


